Aquest seria el primer programa que executarà el robot. El funcionament és fàcil. Seguir recte fins trobar una paret. Girar fins deixar de trobar una paret i finalment seguir recte. Veurem com funciona en un laberint...
Per començar a construir el robot, farem servir el sensor de distància "SEE-ULTRA"
Podem trobar informació a la següent web: Sensor Distància
Tenim un tutorial a la pàgina de Arduino de com conectar un sensor d'ultrasons: Arduino tutorial
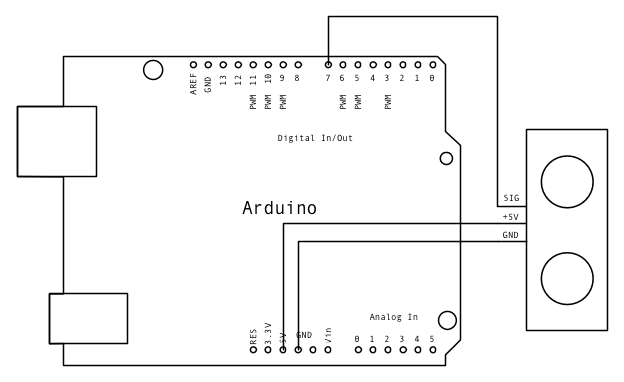
L'Schematic és molt sencill:
El codi Font del Arduino serà:
/* Ping))) Sensor
This sketch reads a PING))) ultrasonic rangefinder and returns the distance to the closest object in range. To do this, it sends a pulse to the sensor to initiate a reading, then listens for a pulse to return. The length of the returning pulse is proportional to the distance of the object from the sensor.
The circuit: * +V connection of the PING))) attached to +5V * GND connection of the PING))) attached to ground * SIG connection of the PING))) attached to digital pin 7
http://www.arduino.cc/en/Tutorial/Ping
created 3 Nov 2008 by David A. Mellis modified 30 Aug 2011 by Tom Igoe
This example code is in the public domain.
*/
// this constant won't change. It's the pin number // of the sensor's output: const int pingPin =7;
voidsetup(){ // initialize serial communication: Serial.begin(9600); }
voidloop() { // establish variables for duration of the ping, // and the distance result in inches and centimeters: long duration, inches, cm;
// The PING))) is triggered by a HIGH pulse of 2 or more microseconds. // Give a short LOW pulse beforehand to ensure a clean HIGH pulse: pinMode(pingPin,OUTPUT); digitalWrite(pingPin,LOW); delayMicroseconds(2); digitalWrite(pingPin,HIGH); delayMicroseconds(5); digitalWrite(pingPin,LOW);
// The same pin is used to read the signal from the PING))): a HIGH // pulse whose duration is the time (in microseconds) from the sending // of the ping to the reception of its echo off of an object. pinMode(pingPin,INPUT); duration =pulseIn(pingPin,HIGH);
// convert the time into a distance inches = microsecondsToInches(duration); cm = microsecondsToCentimeters(duration); Serial.print(inches); Serial.print("in, "); Serial.print(cm); Serial.print("cm"); Serial.println(); delay(100); }
long microsecondsToInches(long microseconds) { // According to Parallax's datasheet for the PING))), there are // 73.746 microseconds per inch (i.e. sound travels at 1130 feet per // second). This gives the distance travelled by the ping, outbound // and return, so we divide by 2 to get the distance of the obstacle. // See: http://www.parallax.com/dl/docs/prod/acc/28015-PING-v1.3.pdf return microseconds /74/2; }
long microsecondsToCentimeters(long microseconds) { // The speed of sound is 340 m/s or 29 microseconds per centimeter. // The ping travels out and back, so to find the distance of the // object we take half of the distance travelled. return microseconds /29/2; }
Comença el nou projecte. Anem a construir un nou robot amb el processador Arduino com a controlador central. Aquest robot es guiara mitjançant un sensor de distància fent servir la tecnología d'ultrasons.
Com podeu veure , degut a la meva eterna dedicació a la UOC, no he pogut avançar res el projecte. De fet, crec que tornaré a començar de zero amb el background que tinc. Espero fer un de millor.
Amb una caixa de cd's i una mica de bricomania, sembla que tenim quelcom més estable.El nou software no ha funcionat be, així que demà toca modificar-lo i el penjaré aquí.
Actualment tinc dos problemes (roboticament parlant). 1 Els motors tenen massa potència. 2 No disposo d'una base sòlida per instal·lar la placa i els motors.
Per sol.lucionar el tema de la potència dels motors , he fet canvis en el software, introduint pulsació en fraccions de 10 mili segons a cada motor. Avui podré mirar si funciona. Per el segon problema , encara no tinc una solució... continuaré investigant.
He acabat la UOC i torno a tenir temps per tornar a la meva afició preferida. Estic intentant posar la placa sobre alguna plataforma, juntament amb el motor.De moment, estic mirant amb una capsa de CD's...